How to Prep & Use Adapted Books to Teach Life Cycles in Special Education
Are you looking for adapted books for your special education classroom that include real photographs?
Keep reading to learn how to prep these hands-on adapted books and how to use them in your preschool, kindergarten or special education classroom this spring!

The transition from winter to spring is my favorite! As we say goodbye to helping students with alllll the winter gear, we get to say hello to easier transitions and new activity ideas!
There are so many exciting spring activities we can do, but there is something special about teaching about life cycles! If you've been lucky enough to have the opportunity in your school to watch chicken eggs hatch into baby chicks, or caterpillars transform into butterflies, you know what I mean!
Teaching children about life cycles has so many benefits! It can help them understand the natural world, develop their scientific thinking skills, their sequencing skills, and appreciate the diversity of living organisms. It can also foster empathy, curiosity, and respect for other living beings.
If you're wondering how to teach (or review) life cycles in your early childhood or special education classroom, don't worry! I have the perfect resource for you! It's easy to set up, hands-on, and can be reused over and over again! That's right! Prep it once and you'll be set for years to come!
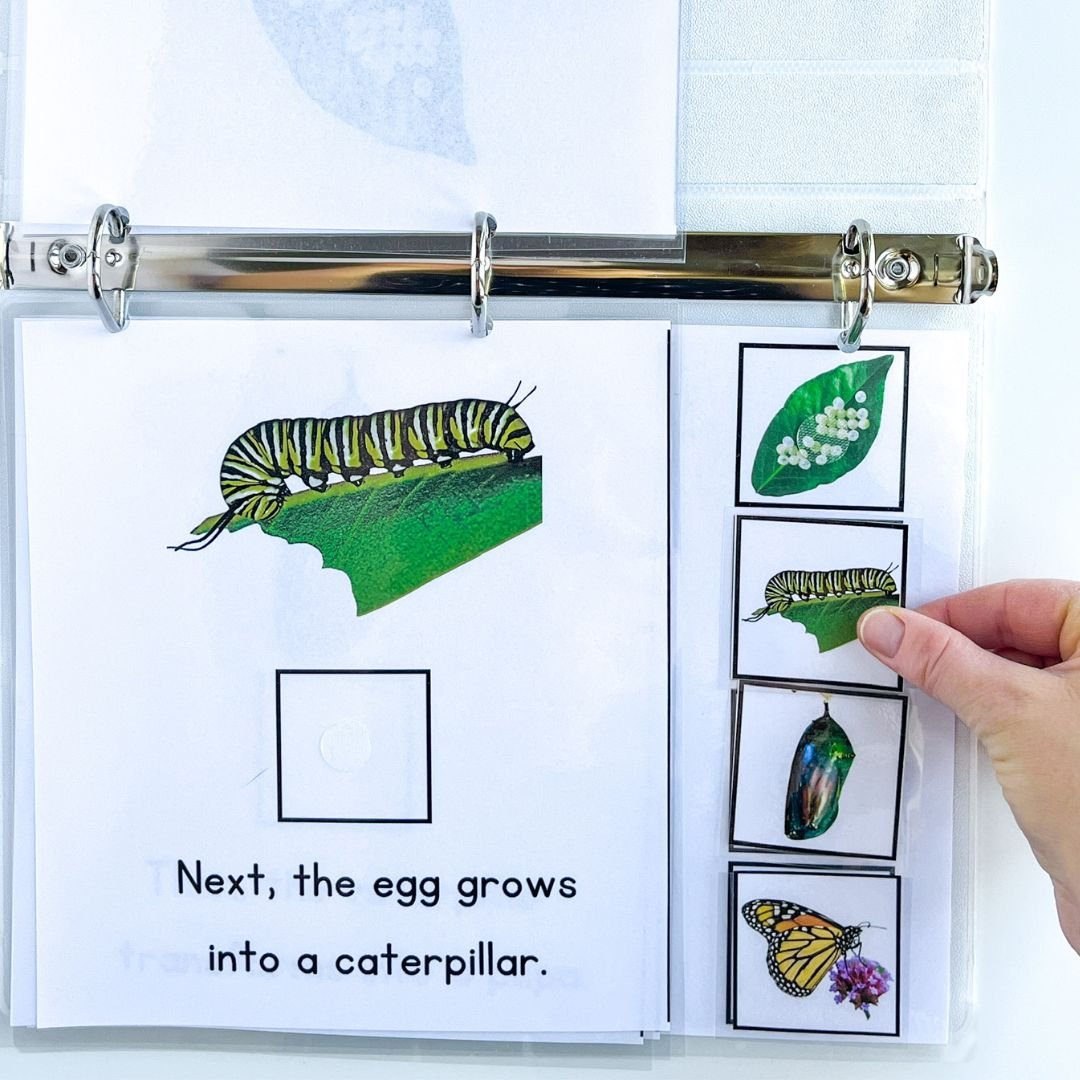
These life cycles adapted books are beautiful! They include high quality real photographs as well as clear and simple language (written in first, next, then, last format). There are 7 available including:


I've created a video on how to easily prep these adapted books using a binder, but you could also bind these with a binding machine or use binding rings to fasten it together. Here are the steps I use to prep adapted books for early childhood and special education classrooms. I'll list the steps, and then go into further detail below.
Print the adapted book
Trim the adapted book pages and picture pieces
Place the pages and pieces into laminating sheets
Laminate
Trim your laminated pieces
Punch holes for fastening (with either a hole puncher or binding machine)
Add your pages to a binder, binding rings, or binding comb (using a machine).
Add Velcro to your pages and your pieces
Attach your image pieces to the book
Your book is ready to read and use
Step 1: Print the adapted book
The very first step is to print the adapted book you wish to prep. My life cycle adapted books are available to download separately, or all together as a bundle.

Step 2: Trim the adapted book pages and picture pieces

Follow the instructions on the pages to trim them. These have been designed for easy prep, with each of the pages lined up, so you can do this in one or two cuts if you have a paper cutter. Then, trim the four image pieces. The last page does not need to be cut.
Step 3: Place the pages and pieces into laminating sheets
Place each of your pages into a laminating sheet. Place your 4 cut images as well. I like to use a small dot of glue from a glue stick (don't use white school glue) on smaller images to keep them from sliding around when being fed into the laminator.

Step 4: Laminate
I like using the Fellowes Halo laminator but I've also used the Scotch laminator, an industrial sized laminator, self laminating sheets, and even the iron hack (which works, but the quality isn't the greatest). This step is pretty easy and straight forward, but if you have any questions, you can send me a DM on Instagram. Like many in special education, I love laminating, and am happy to chat about it anytime!
Step 5: Trim your laminated pieces
I like to leave a small margin of laminating after the page ends, so my pieces don't peel.

Step 6: Create holes for fastening
Regardless of which method you use, you'll need to create holes. If you use a three ring hole punch, i recommend using a strong one, and testing a regular piece of paper to make sure the holes will align where you want them to. If you use a single hole punch, you can create your holes in one piece, and then use that as a guide to mark holes in your other pieces, so they all line up. If you're using a binding machine, follow the instructions or ask someone who uses it often to show you how it's done.

Step 7: Add your pages
This step is pretty straight forward. Add your pages to your binder, your binding rings or your binding combs / spirals using a machine.

Step 8: Add Velcro to your pages and your pieces
My adapted books have two options for the final page where the image pieces are stored. One of these has the photos on it (so students can match up where the images go). For this reason, I love using these transparent Velcro dots, so that the Velcro doesn't cover the image. However, you can purchase regular hook and loop fastener Velcro strips and dots at most dollar stores. I like to use the rough Velcro on the book and soft Velcro on the movable pieces.
Step 9: Attach your pieces to the book
Simply attach the piece to the side of the book as shown.
Step 10: Your book is ready to read and use
Your adapted book is now ready to be read and used for years to come! Enjoy!